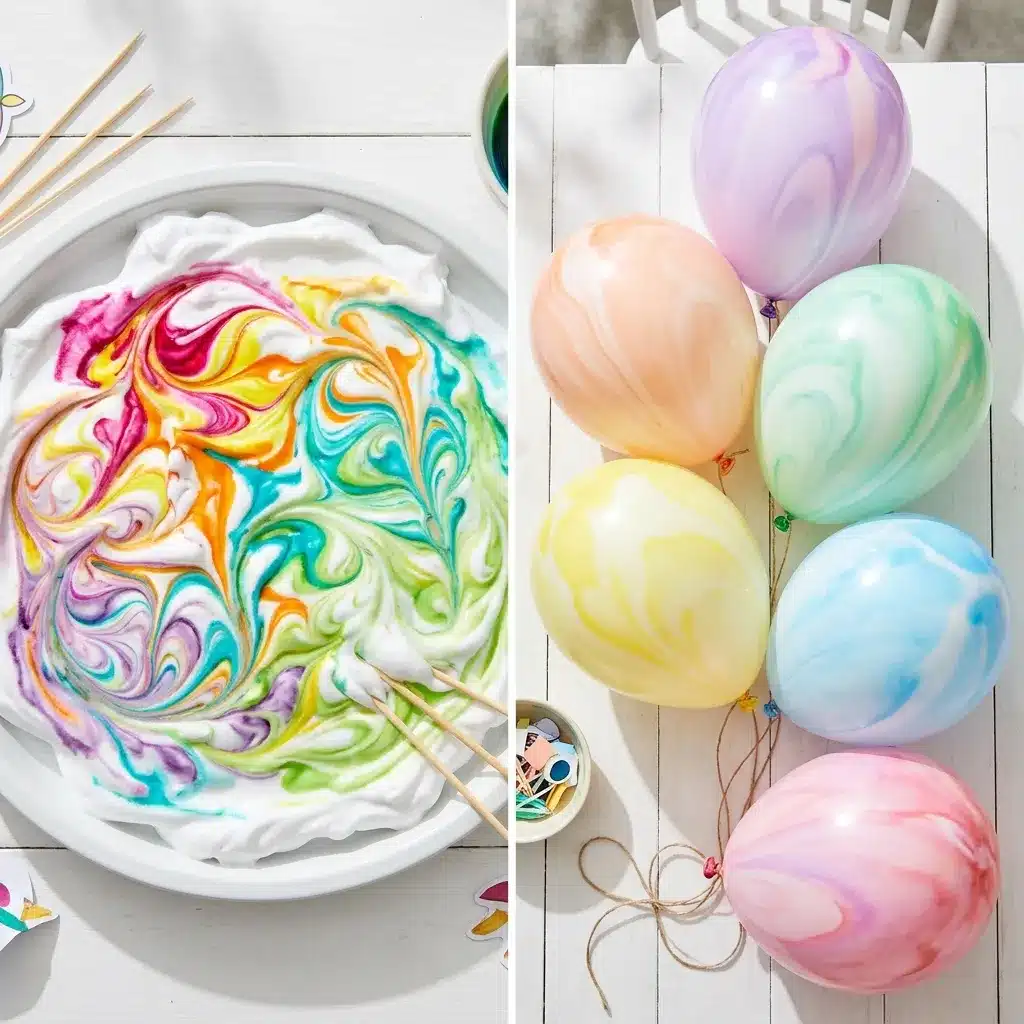
Looking for a colorful afternoon activity that keeps little hands busy? These two rainbow DIY projects turn everyday supplies into something fun, creative, and surprisingly satisfying.
On one side, you have beautiful rainbow shaving cream art, where colorful swirls create one-of-a-kind marbled paper designs. On the other, you have soft, squishy DIY marbled stress balls that kids can squeeze, stretch, and admire.
The best part? Both projects are easy to customize with your favorite colors, and you don’t need expensive craft supplies to get started.
Whether you’re planning a rainy-day activity, a weekend family craft session, or a colorful sensory play afternoon, here’s how to make both designs at home.
Project 1: Rainbow Shaving Cream Marbled Art
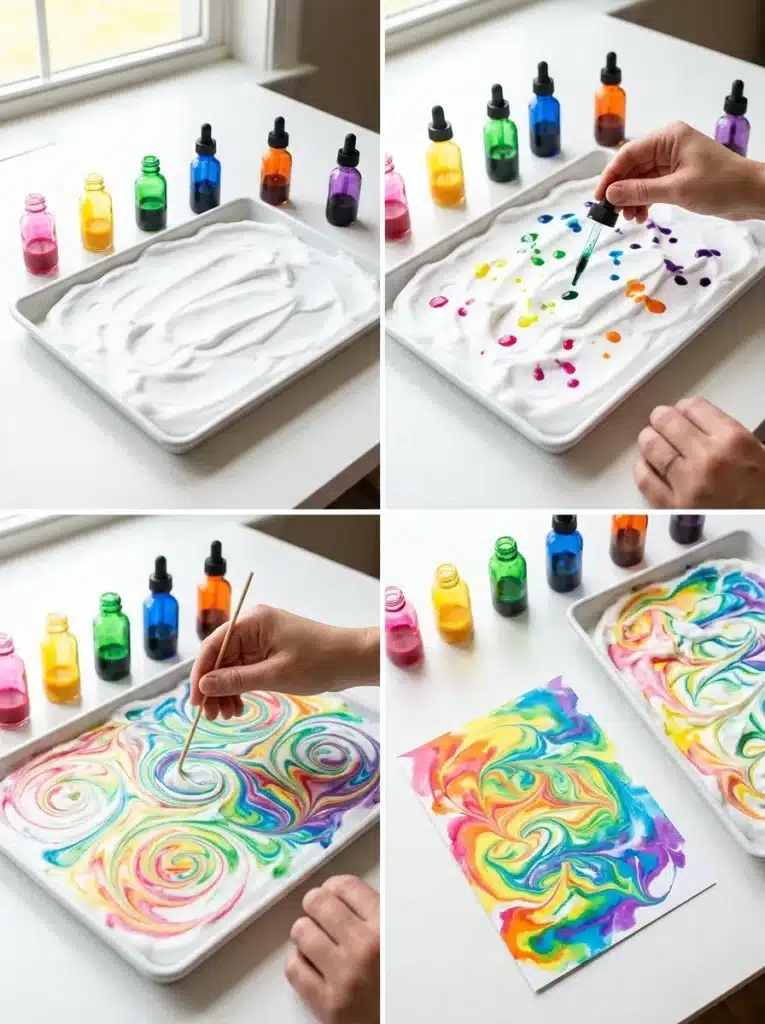
Rainbow shaving cream art is a simple marbling technique that uses shaving foam and liquid color to create beautiful patterns on paper.
The colors float across the foam, allowing you to swirl them into waves, spirals, and rainbow designs. When you press paper onto the surface, the pattern transfers to the paper.
Every print comes out a little different, which makes this project especially fun for kids.
Materials You’ll Need
- 1 can of plain white shaving foam, not clear gel
- Liquid food coloring or washable liquid watercolor paint
- White cardstock or thick watercolor paper
- A shallow baking tray or plastic container
- Toothpicks, skewers, or a craft stick
- A plastic scraper or old gift card
- Paper towels
- Disposable gloves (optional)
Tip: Washable liquid watercolor paint is a useful alternative to food coloring if you’re worried about stained fingers.
How to Make Rainbow Shaving Cream Art
Step 1: Prepare Your Craft Station
Cover your table with newspaper, a plastic tablecloth, or parchment paper.
Place your shallow tray in the center of the workspace and gather your colors.
Choose four to six bright colors for a rainbow effect. Pink, yellow, green, blue, and purple make a beautiful combination.
Step 2: Add the Shaving Cream
Shake the shaving foam can and spray a generous layer into the tray.
Spread the foam evenly with a spatula or craft stick until you have a smooth surface approximately one inch thick.
You don’t need a perfectly flat surface, but try to avoid large gaps.
Step 3: Add Your Rainbow Colors
Drop small amounts of food coloring or liquid watercolor across the shaving cream.
Space the colors around the tray rather than pouring everything into one spot.
Try arranging the colors in rainbow order:
- Red or pink
- Orange
- Yellow
- Green
- Blue
- Purple
Start with just a few drops of each color. You can always add more later.
Step 4: Create the Marbled Design
Take a toothpick or wooden skewer and gently drag it through the colored shaving cream.
Try these different patterns:
| Design | How to Create It |
|---|---|
| Rainbow Waves | Drag the skewer back and forth in gentle S-shaped movements. |
| Spiral Swirls | Move the skewer in small circular motions. |
| Feather Pattern | Draw straight lines through the colors, then drag perpendicular lines across them. |
| Marble Effect | Move the skewer randomly through different color sections. |
| Rainbow Hearts | Drop colors in small circles and drag the skewer through their centers. |
Important: Stop swirling while the colors are still distinct. Too much mixing can turn your beautiful rainbow into a muddy brown or gray.
Step 5: Transfer the Design to Paper
Carefully place a sheet of white cardstock directly onto the shaving cream.
Press gently across the back of the paper so the entire surface makes contact with the colorful foam.
Leave it in place for approximately 5 to 10 seconds.
Lift the paper slowly from one corner.
The paper will look messy at first, but don’t worry. The design is hiding underneath the foam!
Step 6: Reveal Your Rainbow Artwork
Place the paper on a clean, flat surface.
Use an old gift card or plastic scraper to remove the shaving cream in one smooth movement.
As the foam comes away, the colorful marbled design appears underneath.
Set your artwork aside to dry completely.
Your rainbow shaving cream art is ready!
Creative Ways to Use Your Rainbow Art
Once the paper dries, you can turn it into several different crafts.
- Handmade birthday cards
- Colorful bookmarks
- Rainbow wall art
- Gift tags
- Decorative paper butterflies
- Homemade greeting cards
- Personalized notebook covers
You can also cut the finished paper into heart shapes for Valentine’s Day or stars for colorful bedroom decorations.
Project 2: DIY Marbled Stress Balls
The second design in the photo features colorful balloons with a soft, marbled appearance.
These are inspired by the look of marbled balloon stress balls, which can be made using balloons and a soft filling.
There are several ways to create them, but the following method uses flour or cornstarch to make a simple squishy sensory toy.
For the closest visual match to the photographed balloons, choose translucent marbled balloons rather than ordinary opaque balloons.
Materials You’ll Need
- Translucent or pre-marbled latex balloons
- Cornstarch or all-purpose flour
- A small plastic funnel
- An empty plastic water bottle
- A spoon
- A wooden skewer or chopstick
- Scissors
- Extra balloons for a protective outer layer
Color ideas: Pastel blue, lavender, peach, mint green, pale yellow, and pink.
How to Make Marbled Stress Balls
Step 1: Prepare Your Balloons
Choose a balloon in your favorite color.
Gently stretch it several times with your hands to make it easier to fill.
You can also inflate it slightly and release the air before adding the filling.
This helps loosen the latex.
Step 2: Fill the Plastic Bottle
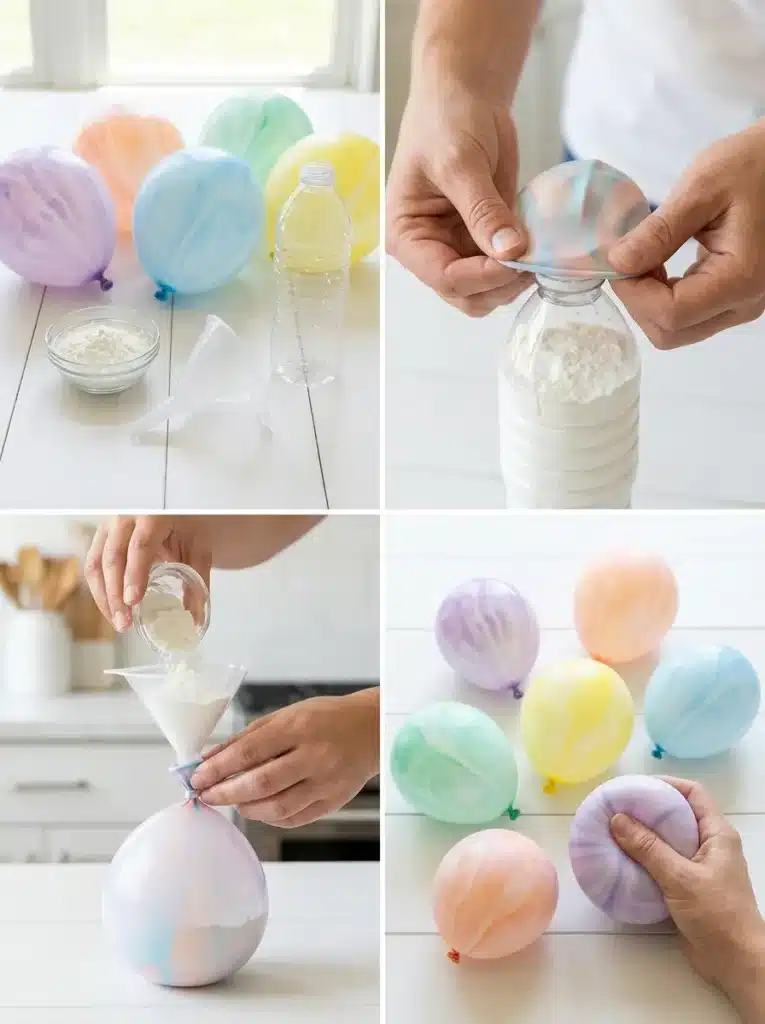
Place your funnel into the opening of an empty plastic water bottle.
Add approximately ½ cup of cornstarch or flour.
The amount you need depends on the size of your balloon and how firm you want your finished stress ball.
Cornstarch generally creates a soft, smooth filling, while flour produces a slightly different texture.
Step 3: Attach the Balloon
Stretch the balloon opening carefully over the neck of the bottle.
Make sure it fits securely.
Turn the bottle upside down so the flour or cornstarch begins moving into the balloon.
Gently squeeze or tap the bottle to help the filling move through the opening.
If the powder becomes stuck, turn the bottle upright and carefully loosen it before continuing.
Step 4: Adjust the Filling
Once the balloon contains enough powder, carefully remove it from the bottle.
Hold the neck upright to prevent spills.
Gently squeeze the balloon to check its texture.
Add more filling if you want a firmer stress ball, or use less for a softer result.
Step 5: Remove Excess Air
Carefully squeeze excess air from the balloon while keeping the filling inside.
Tie a secure knot at the opening.
Avoid stretching the balloon too tightly. A little room allows the filling to move when squeezed.
Step 6: Add a Protective Layer
For a more durable stress ball, place the filled balloon inside a second balloon.
Cut the narrow neck from the second balloon, then stretch its opening over the filled balloon.
Position the second balloon so it covers the first balloon’s knot.
Use a matching or translucent color to preserve the marbled appearance.
Your homemade stress ball is ready to squeeze!
How to Get the Marbled Balloon Look
The balloons in the reference photo have a translucent, cloudy color pattern rather than a completely solid finish.
The simplest way to recreate this appearance is to purchase pre-marbled or agate-style balloons and fill them.
If you want to make your own decorative version, you can experiment with placing small pieces of colored balloon inside a translucent outer balloon before filling it.
Keep in mind that a powder-filled balloon will look more opaque than the air-filled balloons in the photo. The finished stress ball will have a similar pastel color theme, but it will not be identical to the pictured balloons.
Rainbow Shaving Cream Art vs. DIY Stress Balls
Not sure which project to try first?
Here’s a quick comparison.
| Feature | Rainbow Shaving Cream Art | DIY Marbled Stress Balls |
|---|---|---|
| Main Activity | Painting and color mixing | Filling and sensory play |
| Difficulty | Easy | Easy with adult assistance |
| Approximate Time | 15 to 30 minutes plus drying | 10 to 20 minutes |
| Main Materials | Shaving foam, colors, paper | Balloons, flour or cornstarch |
| Finished Project | Colorful marbled artwork | Squishy sensory toy |
| Mess Level | Medium to high | Low to medium |
| Best For | Creative art activities | Hands-on sensory activities |
Both projects work well for family craft afternoons, but rainbow shaving cream art is especially useful when you want a colorful finished project that kids can display or give as a gift.
Helpful Tips for Better Results
Choose Bright Colors
Vivid colors create beautiful rainbow patterns, especially when you place contrasting shades next to each other.
Try pink beside blue, yellow beside purple, or green beside orange.
Use Thick Paper
Regular printer paper can become soggy when pressed into shaving cream.
Cardstock or watercolor paper holds its shape better and makes the finished artwork easier to display.
Don’t Overmix Your Colors
The secret to beautiful marbling is knowing when to stop.
A few gentle swirls create interesting patterns. Too many swirls blend everything together.
Protect Your Work Surface
Food coloring can stain tables, clothing, and hands.
Use a washable table covering and keep paper towels nearby.
Supervise Children
Both projects require adult supervision.
Shaving cream is not edible and should stay away from mouths and eyes. Use it only with children old enough to follow those rules.
Latex balloons can cause choking or suffocation if children put uninflated balloons or broken pieces in their mouths. Adults should handle balloon preparation, and children under 8 should not handle uninflated or broken balloons. These homemade stress balls are not suitable for toddlers or children who mouth toys.
If a stress ball develops a tear, discard it immediately. Avoid latex balloons entirely for anyone with a latex allergy.
Frequently Asked Questions
Can I Make Rainbow Shaving Cream Art Without Food Coloring?
What Kind of Paper Works Best for Shaving Cream Art? How Long Does Shaving Cream Art Take to Dry? Can I Reuse the Shaving Cream? What Is the Best Filling for Homemade Stress Balls? Can I Make Stress Balls Without Balloons?
Can I Make Rainbow Shaving Cream Art Without Food Coloring?
Yes! Washable liquid watercolor paint works well for this activity.
You can also experiment with small amounts of washable liquid tempera paint, although the results may look different depending on the paint’s thickness.
What Kind of Paper Works Best for Shaving Cream Art?
White cardstock and watercolor paper are good choices.
They absorb the transferred color while holding their shape better than thin printer paper.
How Long Does Shaving Cream Art Take to Dry?
Most prints dry within a few hours, depending on the paper, amount of moisture, and room conditions.
Leave the artwork flat until completely dry.
Can I Reuse the Shaving Cream?
Yes, you can usually make several prints from the same tray.
Add a few fresh drops of color and gently swirl the surface again before making another print.
Replace the foam when the colors become too mixed.
What Is the Best Filling for Homemade Stress Balls?
Cornstarch and flour are two common options.
Cornstarch creates a soft powder-filled texture, while flour can feel slightly different when squeezed.
Neither is suitable if the balloon may be punctured or opened by a child.
Can I Make Stress Balls Without Balloons?
Yes. Sewn fabric sensory pouches and securely sealed reusable sensory bags are possible alternatives, although they produce a different texture and appearance.
For younger children, choose a commercially made, age-appropriate sensory toy instead of a homemade balloon stress ball.
Final Thoughts
Rainbow shaving cream art and DIY marbled stress balls are two colorful ways to bring a little creativity into an ordinary afternoon.
If you love bright patterns and hands-on painting, start with the shaving cream marbling project. Watching the rainbow design appear as you scrape away the foam is half the fun!
If you prefer a soft, squishy sensory project, try making a pastel stress ball with a pre-marbled balloon.
Which would your family choose first: messy rainbow art or soft, squishy play?
Share your favorite colors and creative ideas in the comments!