
Be warned, these Pumpkin Oreo Balls disappear fast. Picture this: the warm aroma of buttery cookies fills your kitchen, cinnamon swirls through the air, and there’s a hint of sweet cream cheese in the mix. You know something delicious is about to happen, and your heart does a little happy dance. That’s the magic of baking, and today, we are diving into a sweet treat that will have everyone coming back for seconds, or thirds if you’re lucky. Let’s get whisking and rolling!
Why You’ll Love This Pumpkin Oreo Balls
Oh, where do I begin? Pumpkin Oreo Balls are not just desserts; they are little bites of joy that bring a smile to your face with every single nibble. Each ball is an indulgent blend of the iconic Oreo cookie and creamy pumpkin flavor wrapped in a sweet orange candy coating. If summer is all about ice cream, then fall surely belongs to these delightful goodies.

Picture this: chilly autumn evenings spent with family, the kids laughing and trying to sneak snacks from the counter while the adults chat about life over a cup of warm cider. It’s those cozy moments that Pumpkin Oreo Balls embody. Whether it’s Halloween, Thanksgiving, or just a regular Tuesday, these treats make every occasion a little extra special.
Everyone in the family loves them! Kids adore the chocolatey taste mixed with the pumpkin goodness, while adults appreciate how quick and easy they are to whip up. They are also perfect for sharing; a plate of these at a gathering will certainly ignite conversations and memories. This recipe has made it to our family’s regular rotation because, let’s be honest, who doesn’t want to savor an Oreo turned into a seasonal masterpiece?
How to Make Pumpkin Oreo Balls
“If your kitchen smells like butter and brown sugar, you’re doing it right.”
Making Pumpkin Oreo Balls is as easy as it gets. You don’t need to be a baking pro or spend hours in the kitchen to achieve deliciousness. The playful process of mixing, rolling, and decorating is where the fun truly lies. It is all about engaging your senses: feel the crunch of the Oreos, see the bright orange candy melt, and smell the sweetness fill the air.
Ingredients You’ll Need
Here’s the sweetheart lineup you’ll need to create your Pumpkin Oreo Balls:
- 36 Oreo cookies
- 8 oz cream cheese (softened)
- 12 oz orange candy melts
Remember, using real butter in any baking recipe truly enhances the flavor. And heed my advice, don’t skip the pinch of salt. It makes everything taste even sweeter!
Step-by-Step Directions
Time to turn this sweet vision into reality! Here’s how you can create these yummy Pumpkin Oreo Balls from scratch:
- Pulse Oreo cookies: Start by placing the Oreo cookies into a food processor. Pulse until they are finely crumbled, like beach sand.
- Mix in cream cheese: Add the softened cream cheese to the crumbled cookies. Mix until everything is well combined and forms a thick dough. You can use a spatula or your hands to get in there.
- Scoop into balls: Using a small cookie scoop or your hands, scoop out the mixture and roll it into 1-inch balls. It can get a little messy, but that’s part of the fun.
- Refrigerate: Place the balls on a parchment-lined baking sheet. Refrigerate them for about 15 minutes to firm up.
- Score the balls: Here’s a quirky little step using a toothpick, score lines into the tops of the chilled Oreo balls to make them look like pumpkins. This is where a little patience pays off.
- Melt the candy: While the balls chill, you can melt the orange candy wafers. Use a double boiler or microwave according to the package instructions, stirring until smooth.
- Dip the balls: Take each chilled ball and dip it into the melted orange candy, letting the excess drip off.
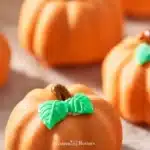
- Decorate: Place the dipped balls back on the parchment-lined sheet. Immediately press a small pretzel stick into the top for the pumpkin stem, and add some green icing for the leaves. Now they look like little pumpkins!
- Refrigerate again: Place the decorated Pumpkin Oreo Balls back in the refrigerator until you’re ready to serve.
And there you have it! Each step filled with laughter, anticipation, and a tiny sprinkle of mess the upside of baking!
Serving Pumpkin Oreo Balls With Love
These Pumpkin Oreo Balls are best served straight out of the fridge on a lovely autumn afternoon. Imagine gathering around the table after dinner, a platter of these little delights in the center. As you take a bite, the creamy filling blends well with that crunchy Oreo exterior, while the sweetness of the candy shell wraps it all up in a hug of happiness.

They are fantastic alongside a cup of coffee or as a dessert centerpiece at family dinners. Be prepared; everyone will be reaching for seconds, and you’ll be left smiling, knowing you’ve delighted taste buds in the most scrumptious way.
How to Store and Enjoy Later
If there are any Pumpkin Oreo Balls left though I doubt it storing them is straightforward. Keep them in an airtight container in the refrigerator. They can last up to a week, but let’s be real; with these tasty gems, it’s precarious to wait that long!
If you’re lucky enough to have leftovers, you can also freeze them. To do this, lay them on a baking sheet until solid, then transfer them to a freezer bag. They will keep in the freezer for up to two months. Just thaw them in the fridge a day in advance before serving.
Tips, Tricks, and Sweet Secrets
Here are some baking insights that I’ve learned throughout the years, all tried and true:
- Crunchy Topping: Want an extra crunch? Add crushed nuts or sprinkles on top of the melted candy. They add a fun texture and flavor.
- Flavored Candy Melts: Don’t be afraid to experiment! Almond bark or chocolate-flavored candy melts can bring a different vibe to your treats.
- Drizzling Magic: After dipping and decorating, you can drizzle melted white chocolate or colored candy melts on top for an added pop of flavor and visual appeal.
- Bite-Sized Surprises: To switch things up, instead of making balls, try pressing the mixture into a small square pan to cut into bars. A new approach for a classic combination!
- Seasonal Variations: Think outside the box! Around the holidays, try adding peppermint extract for a festive flavor explosion, or use colored candy melts to match the season red for Christmas or pastel shades for Easter.
Delicious Variations
While the classic Pumpkin Oreo Balls are a hit, there’s always room for delicious variations. Here are some twists you might enjoy:
- Spiced Pumpkin: Add a sprinkle of pumpkin pie spice into the cream cheese mixture for that extra fall flavor.
- Autumn Fruits: Tenderize the moments by mixing dried cranberries or chopped nuts into the batter for texture and flavor.
- Chocolate Lovers: Integrate some crushed chocolate chips into the mixture for an extra chocolatey delight.
- Brownie Bottom: For something really indulgent, place your Oreo mixture on top of a baked brownie base before coating them in candy.
- Themed Toppings: Get festive! Use themed candies like candy corn for Halloween, or sprinkle edible glitter for a frosty winter look.
Hungry for More Sweet Inspiration?
Don’t stop here! I’ve got a whole tray of cozy desserts waiting for you — from gooey cobblers to dreamy crisps and frosted muffins.
👉 Explore More Dessert Recipes Here
Pumpkin Oreo Balls
Ingredients
Method
- Pulse Oreo cookies in a food processor until finely crumbled.
- Add softened cream cheese to the crumbled cookies and mix until well combined.
- Scoop the mixture and roll it into 1-inch balls.
- Place the balls on a parchment-lined baking sheet and refrigerate for about 15 minutes.
- Score lines into the tops of the chilled Oreo balls using a toothpick.
- Melt the orange candy wafers according to package instructions.
- Dip each chilled ball into the melted orange candy, letting excess drip off.
- Place the dipped balls back on the baking sheet and immediately press a pretzel stick into the top.
- Use the green icing to add leaves for decoration.
- Refrigerate the decorated Oreo balls until ready to serve.
Nutrition
Notes
Tried this recipe?
Let us know how it was!FAQs About Pumpkin Oreo Balls
Q: What if I don’t have cream cheese?
A: You can substitute with mascarpone cheese it will still give you that creamy texture and flavor!
Q: Can I use gluten-free Oreos?
A: Absolutely! Gluten-free Oreos are just as delicious, so feel free to swap them in.
Q: How can I make these without food coloring?
A: No problem! You can use white chocolate and leave them uncolored for a more classic look. They’ll still taste amazing!
Q: Do I have to refrigerate them?
A: While you can leave them out for a short time, refrigeration helps to maintain the shape and firm texture.
Q: Can I make these ahead of time?
A: Yes! Pumpkin Oreo Balls can be made up to two days in advance and stored in the fridge until you’re ready to serve.
A Final Bite
So there we have it Pumpkin Oreo Balls, the delightful little treats that bring joy to your kitchen, smiles to your family, and whimsy to your gatherings. Once you bake these beauties, you’ll be the one everyone calls for dessert requests. You’ve been warned: bake this once, and you may just find yourself roped into bringing them to every family gathering! Happy baking!
Let’s Talk Desserts on Twitter
Baking is more fun when we share it together. Come join me on Twitter, where I post even more cozy bakes, seasonal treats, and sweet kitchen ideas you can whip up anytime.
👉 Follow Me on Twitter for Daily Dessert Joy