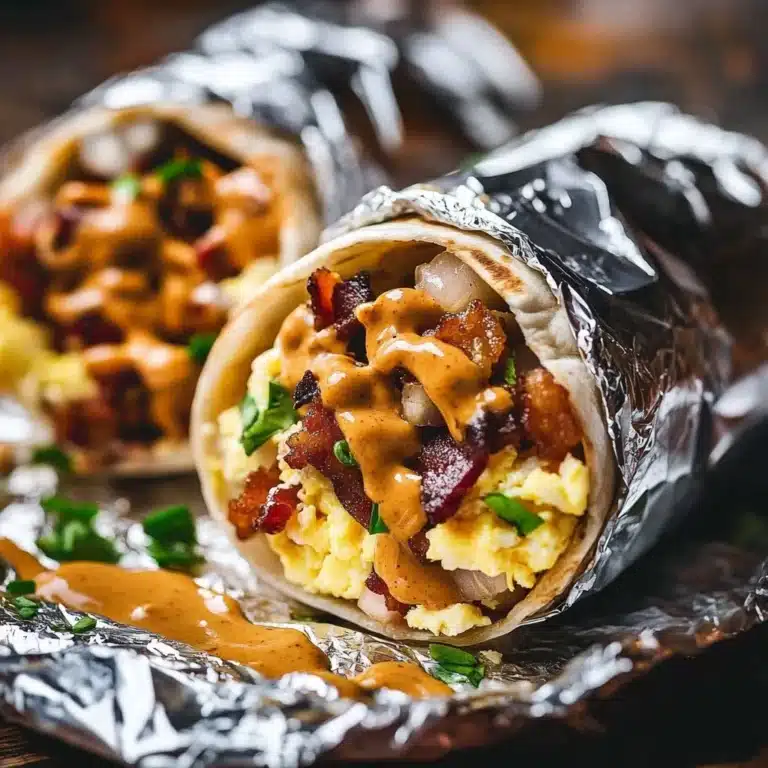

Be warned, these breakfast burritos disappear fast. Close your eyes and imagine hot roasted peppers and onions, potatoes with golden edges, and savory crumbled meat under a blanket of fluffy, cheesy eggs. The smell of olive oil and warm tortillas will pull everyone into the kitchen like a magnet.
If you love make-ahead breakfasts that feel like a hug in food form, you are in the right place. Before we roll into the details, consider trying a warm bowl version for busy mornings with this breakfast burrito bowl that delivers many of the same cozy flavors when you need a fork instead of a tortilla.
Why You’ll Love This Protein-Packed Breakfast Burritos Ready to Freeze & Reheat
These burritos are the kind of recipe that makes weekday mornings manageable and weekend brunches joyful. They are hearty, protein-packed, and built to withstand the freezer with pride.
They work for families, roommates, and hurried souls who need a filling meal in minutes. Make a batch on Sunday and you have breakfasts for weeks. They are also perfect for packing into a lunch box with a side of fruit.
This recipe became a family favorite because it balances texture and comfort. The roasted potatoes offer that gentle crisp edge, the meat brings savory depth, and the cottage-cheese enriched eggs stay creamy even after reheating. Once you try it, you will understand why we keep a stack in the freezer.

How to Make Protein-Packed Breakfast Burritos Ready to Freeze & Reheat
“If your kitchen smells like butter and brown sugar, you’re doing it right.”
Let’s walk through the method in plain, friendly steps. You will roast veggies and potatoes first to get color and flavor. Then you will add the meat and finish it all with a silky egg pour that bakes into a tender, sliceable sheet. From there, you wrap, freeze, and stash for future mornings.
You will notice lots of little smells as you go. Olive oil warming on the pan carries the scent of roasted onion. Paprika and garlic powder bloom into something comforting when the meat hits the heat. And when the eggs set under the melted cheese, your kitchen starts to feel like Sunday morning, even if it is Tuesday.
The Sweet Line-Up
1 cup bell peppers (diced, any color)
1 cup onions (diced, yellow or white)
2 cups yellow potatoes (diced, Yukon Gold preferred)
1 lb lean ground meat (turkey, chicken, or 93/7 beef, raw weight)
6 large eggs
4 large egg whites
1/2 cup cottage cheese (full-fat for best texture)
1 cup shredded cheddar cheese (sharp cheddar recommended)
2 tablespoons olive oil
salt and pepper (to taste)
1 teaspoon paprika
1 teaspoon garlic powder
1 teaspoon onion powder
10 large burrito-sized tortillas (Grande size)
favorite sauce (salsa, hot sauce, or both)
1/4 cup fresh cilantro (chopped)
Friendly notes and quick swaps: use real butter for the best flavor if you prefer it over olive oil. Don’t skip the salt; it makes the savory notes pop. If you love heat, add a pinch of cayenne or swap the paprika for smoked paprika.
A little personal memory: I once made these for a road-trip crew and everyone ate theirs on the hood of the car like breakfast tacos. We laughed, we burned our tongues, and we drove away with happy bellies. That is the energy this recipe brings.
Step-by-Step Directions
- Preheat and roast the veggies.
Preheat your oven to 400°F. Spread the diced bell peppers, onions, and yellow potatoes evenly on a large sheet pan.
Drizzle with olive oil, season generously with salt and pepper, then toss until well coated. Roast for 20 to 25 minutes until the edges are golden and the potatoes are fork-tender.
Mini tip: Scatter the pieces so they do not overcrowd the pan. Roasting in a single layer gives you caramelized edges instead of steam-soft veggies.
- Add and roast the meat.
Remove the pan from the oven and spread the lean ground meat over the roasted vegetables. Break it up into small crumbles with a spatula.
Season with paprika, garlic powder, onion powder, salt, and pepper. Return to the oven and roast for 10 to 15 minutes until the meat is fully cooked through with no pink remaining.
Mini tip: If you see extra grease, blot with a paper towel. Dry bits hold seasoning better and keep the egg layer from getting greasy.
- Blend the eggs and cottage cheese.
While the meat cooks, blend the eggs, egg whites, and cottage cheese in a blender or food processor until completely smooth, about 30 seconds.
If you do not have a blender, whisk vigorously for 2 to 3 minutes until well combined and slightly frothy.
Mini tip: The cottage cheese makes the egg layer tender and creamy. If you want an ultra-smooth texture, use low-sodium cottage cheese and blend a little longer.
- Pour, cheese, and bake.
Pour the egg mixture evenly over the cooked meat and vegetables, tilting the pan gently so it distributes into all corners. Sprinkle the shredded cheddar cheese on top.
Bake for 12 to 15 minutes until the eggs are set in the center and the cheese is melted and bubbly.
Mini tip: Check the center with a knife. If it comes out clean and the top is lightly golden, you are done. Do not overbake; eggs continue to set as they cool.
- Cool, slice, and assemble.
Let the pan cool for 20 to 30 minutes until it is comfortable to handle. Slice into 10 equal portions using a sharp knife or bench scraper.
If desired, warm your tortillas for 15 to 20 seconds in the microwave to make them more pliable. Place each portion on a tortilla, add a drizzle of your favorite sauce and a sprinkle of fresh cilantro, then fold in the sides and roll tightly from bottom to top to form a burrito.
Mini tip: Warm tortillas prevent cracking and make rolling easier. A damp paper towel over the stack in the microwave works wonders.
- Wrap, freeze, and reheat with confidence.
Wrap each burrito tightly in parchment paper or foil, label with the date, and freeze flat in a single layer on a baking sheet. Once frozen solid, about 2 to 3 hours, you can stack them in a freezer bag to save space.
To reheat from frozen, unwrap completely and place on a microwave-safe plate. Microwave on high for 3 to 4 minutes, flipping halfway through for even heating.
Mini tip: For crisp tortillas, unwrap and pop the reheated burrito under a broiler for a minute or press it in a hot skillet for a quick sear.
A note on timing and texture: If you prefer a softer tortilla after microwaving, wrap the burrito in a damp paper towel while you heat it. If you want the edges a little crunchy, reheat in a skillet for 1 to 2 minutes per side after microwaving.
Serving Protein-Packed Breakfast Burritos Ready to Freeze & Reheat With Love
Serve these burritos warm and slightly steamy for maximum cozy satisfaction. Pair with fresh fruit, a cup of yogurt, or a simple green salad if you want a lighter plate.
For weekend brunches, set out a small topping station. Offer extra salsa, hot sauce, avocados, and pickled jalapeños. Let everyone customize their burrito. It turns the morning into an event and makes the meal feel special.
If you are hosting overnight guests, slice one burrito in half and serve it on a warm plate with a dollop of sour cream. The aroma and presentation will make heads turn and forks reach out.
For a fun spin, serve alongside a bowl version or swap in shredded potatoes for a crispier interior. If bowls are more your style, you might enjoy this hearty tater tot breakfast bowl that echoes many of the same flavors.

How to Store and Enjoy Later
These burritos are forgiving in the freezer. Wrapped tightly, they last up to 3 months. Label the package so you know when you made them and what fillings are inside.
When you plan to reheat, take one out in the morning and let it sit on the counter for a few minutes if you prefer to soften the tortilla a bit. Otherwise, reheat straight from frozen following the microwave method we described earlier.
If you want to reheat more of them at once, use the oven. Place foil-wrapped burritos on a baking sheet and heat at 375°F for 25 to 30 minutes from frozen. This method keeps the texture more uniform and gives a better finish than microwaving for larger batches.
Leftover ideas: Chop a reheated burrito into a skillet and mix with sautéed veggies for a quick scramble. Or slice and serve on top of greens as a warm protein salad. These burritos are flexible, which is part of why we adore them.
Tips, Tricks, and Sweet Secrets
-
Keep the potatoes in small, even dice.
Small pieces roast more evenly and are easier to wrap. If the potatoes are large, they will make rolling awkward and lead to uneven bites. -
Use full-fat cottage cheese for a creamier egg filling.
Low-fat cottage cheese can water out when heated. Full-fat helps the egg custard stay tender and rich. -
Season as you go.
Taste the roasted vegetables and the cooked meat. Adjust salt and pepper before you pour the eggs. Small seasoning changes now save bland mornings later. -
Freeze flat and label with a sticky note.
That way you can stack and find the exact flavor when you are foggy-eyed at 6:30 a.m. -
Make a double batch for holiday mornings.
These keep well and are a lifesaver when relatives arrive hungry. They also travel well in a cooler, which makes them perfect for family road trips.
A tiny experiment I love: add a spoonful of salsa into the egg blend for a saucy undertone. It changes the texture enough to feel new while keeping all the cozy comfort.
Delicious Variations
Play around with fillings to keep your freezer interesting. Swap ground turkey for chorizo if you want a spicy, smoky bite. Try diced sweet potatoes instead of Yukon Gold for a sweeter, fall-friendly profile.
Swap the cheddar for pepper jack and add green chiles for a Tex-Mex vibe. Or keep it classic with Monterey Jack and a hint of cumin.
Vegetarian option: Replace the meat with crumbled tempeh or a can of drained black beans. Roast an extra cup of veggies and add a pinch of cumin and chili powder for depth.
Seasonal twists: In autumn, add a touch of smoked paprika and roast the peppers with cubed butternut squash. In spring, fold in wilted spinach and swap cilantro for fresh parsley for a bright finish. For a cozy winter spin, a tiny sprinkle of nutmeg in the eggs gives a whisper of warmth.
If you like sweet and savory mashups, serve a small side of maple-sriracha for dipping. It is odd and delightful.
Want more breakfast inspiration? Try these sweet potato breakfast bowls for a different take on morning sweet and savory.
Linda’s Little Baking Lessons
Even though this is a savory make-ahead meal, a few baking-style tips will make everything better.
- Uniformity matters. Cut vegetables in similar sizes to ensure even roast and texture.
- Watch the oven; times vary. Use color as a guide more than the clock. Golden brown equals flavor.
- Resting is not optional. Let the pan cool so the egg layer sets cleanly. You will slice without squishing.
I have burned more casseroles than I care to admit. The best trick is patience. A little wait at the end turns a messy scramble into perfect slices.
FAQs About Protein-Packed Breakfast Burritos Ready to Freeze & Reheat
Q: Can I use pre-cooked sausage instead of ground meat?
A: Yes. If the sausage is already cooked, add it after the vegetables roast and warm for 5 minutes. Reduce the extra oven time so the eggs do not overcook.
Q: How do I keep the tortillas from getting soggy in the freezer?
A: Wrap each burrito tightly in parchment first and then foil. The double layer prevents freezer burn and helps keep tortillas from sweating.
Q: Can I make these dairy-free?
A: Sure. Use dairy-free cottage cheese alternatives and a plant-based shredded cheese. The texture will be slightly different but still comforting.
Q: What is the best way to reheat multiple burritos at once?
A: Use the oven at 375°F, foil-wrapped, about 25 to 30 minutes. Flip halfway through for even warming.
Q: Can I freeze them without parchment or foil?
A: You can, but wrapping is safer. Freezer bags alone can work once frozen solid, but early freezes should be on a sheet pan flat so burritos do not deform.
A Final Bite

Bake, Share, and Smile
If you want a reliable breakfast that feels homemade and gives you back precious morning minutes, these Protein-Packed Breakfast Burritos Ready to Freeze & Reheat are your new best friend. You will find yourself making them for busy weeks, potlucks, and mornings when you need a warm, comforting start.
For more make-ahead ideas that match this freezer-friendly vibe, check out this helpful Meal Prep Breakfast Burritos (Freezer Friendly) guide for alternate proteins and seasoning ideas.
If you want another tested freezer method with step-by-step photos, this Freezer Breakfast Burritos – Organize Yourself Skinny post is a great companion for timing and wrapping tricks.
Bake once, stash a dozen, and watch how these little rolls of comfort make mornings friendlier. Trust me, you will be asked to bring them to every gathering.

Protein-Packed Breakfast Burritos
Ingredients
Method
- Preheat your oven to 400°F.
- Spread the diced bell peppers, onions, and yellow potatoes evenly on a large sheet pan.
- Drizzle with olive oil, season generously with salt and pepper, and toss until well coated.
- Roast for 20 to 25 minutes until the edges are golden and the potatoes are fork-tender.
- Remove the pan from the oven and spread the lean ground meat over the roasted vegetables.
- Season with paprika, garlic powder, onion powder, salt, and pepper.
- Return to the oven and roast for 10 to 15 minutes until the meat is fully cooked through with no pink remaining.
- While the meat cooks, blend the eggs, egg whites, and cottage cheese in a blender until smooth.
- Pour the egg mixture evenly over the cooked meat and vegetables.
- Sprinkle the shredded cheddar cheese on top and bake for 12 to 15 minutes until the eggs are set and the cheese is melted.
- Let the pan cool for 20 to 30 minutes and slice into 10 equal portions.
- Warm your tortillas for 15 to 20 seconds in the microwave.
- Place each portion on a tortilla, drizzle with sauce, sprinkle with cilantro, and roll tightly into a burrito.
- Wrap each burrito tightly in parchment paper or foil, label with the date, and freeze flat.
- To reheat, unwrap and microwave on high for 3 to 4 minutes.
- For a crisp tortilla, broil for 1 minute or press in a hot skillet.