

Each winter, the kitchen light felt softer and the house smelled like chocolate and warm milk. I remember the hush that fell when the first hot chocolate bomb met the mug and bloomed like a small, cocoa-scented spring.
Oreo Hot Chocolate Bombs felt like a secret that only our family knew, small rounds of surprise that made a gray afternoon bright. I still carry the sound of cookie crumbs on my palms and the steam that kissed the window when I lifted the mug. If you want a gentle way to make a room feel like home, this is it, and it pairs well with other warm treats I love, like a delicate green tea drink I make some mornings: matcha white hot chocolate.
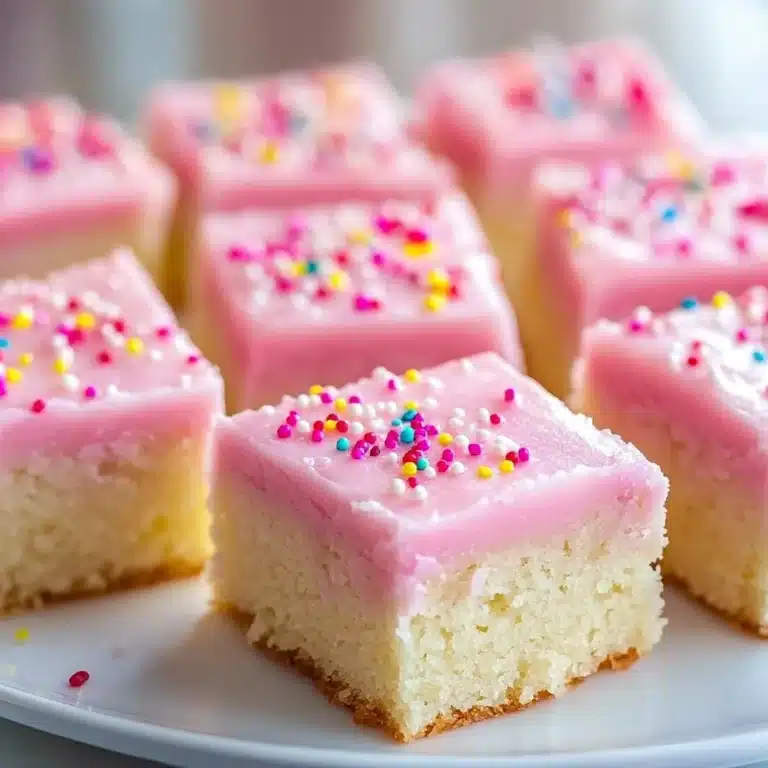
Why Oreo Hot Chocolate Bombs Belongs in Your Kitchen Story

Oreo Hot Chocolate Bombs hold a kind of simple magic. They are small and thoughtful, like a note folded into a pocket. They remind me of the winters when my children would rush in from the cold and press cheeks to the radiator, waiting for the sound of chocolate melting. The cookie edge gives a crisp crack, the marshmallows melt into soft clouds, and the milk turns silky with cocoa and bits of Oreo. These bombs are more than a treat. They are a bridge between a quick modern dessert and the slow, careful ways my family used to gather.
When I make them now, I trace small habits from my mother and grandmother. They taught me to notice texture and taste first. The Oreo shell gives a dark ripple of crunch, while the candy melts offer a pale, creamy contrast. I like the play of light and dark on the plate, and the way people smile when they see a little cookie standing proud on top. If you enjoy playing with flavors at the table, you might also like the cozy simplicity of 3-ingredient pumpkin chocolate candy, which shares the same spirit of warm, easy comfort.
How to Make Oreo Hot Chocolate Bombs
“Every time I stir this pot, it smells just like Sunday at home.”
Before we dive into the steps, take a moment to imagine the colors and sounds. The cookies ‘n’ cream candy melts are pale, almost ivory, and they shine when melted. The dark chocolate is deep and glossy, a near-black brown that catches the light. When you temper the dark chocolate, you will see it thin and gleam like a polished stone. As the molds set, the kitchen cools for a moment, and the scent of sugar and cocoa settles soft and warm. If you like a richer twist, consider pairing these bombs with a dense bar recipe for dessert later: caramel brownie cheesecake chocolate.
Before listing the ingredients, remember this is a calm process. Move slowly at first, notice how the chocolate melts and how the creams and crumbs come together. The texture should feel balanced: shells firm, filling soft, and melt into a silky cup of milk when you pour it.
Gathering the Ingredients
- ⅔ cup Wilton Cookies ‘N’ Cream candy melts
- ¼ cup Wilton Cookies ‘N’ Cream candy melts
- 3.5 oz dark chocolate, around 72% cocoa
- 3 tbsp brown and white sprinkles
- ¼ cup mini marshmallows
- 15 Oreo mini cookies
- 3 heaping tbsp hot chocolate mix
Friendly note: use the freshest marshmallows you can find for the softest, cloud-like melt. If your candy melts are older, warm them gently to restore their smooth flow, but avoid overheating.
Step-by-Step Directions
- To make your hot chocolate bombs, start by melting ⅔ cup of the cookies ‘n’ cream candy melts by microwaving them in a glass bowl for 1 minute at 50% power. Stir well. Microwave at 30-second intervals until they are completely melted. (Mini tip: stir until glossy.)
- Place the silicone molds on a flat movable surface like a cutting board and add about 1 tablespoon of the melted chocolate to 3 of the cavities. Use the back of a spoon to coat the entire half-sphere, trying to make sure the edges are thicker than the bottom. Press gently to even out. (Mini tip: thicker rims hold better.)
- Move the mold to the fridge to set while you start on your dark chocolate halves. Let the candy melts firm up enough to pop out easily. Meanwhile, prep your workspace for the dark chocolate.
- To temper your chocolate, give about ¾ of the dark chocolate a rough chop, and place it in a glass bowl and microwave at 50% power for 30 seconds. Stir the chocolate well and return the bowl to the microwave for another 15 seconds. Watch for shine. (Mini tip: avoid steam, work with dry tools.)
- Using a candy thermometer, check the temperature of the chocolate. Continue microwaving at 15-second intervals until it comes close to, but not passing, 90 degrees! If there are still chunks of chocolate at that point, you should be able to stir your chocolate until it’s creamy. Tempered chocolate will have a smooth, glossy finish and a firm snap when set. (Mini tip: aim for consistency rather than speed.)
- Take the mold out of the fridge and coat the remaining 3 cavities the same way as you did with the candy melts, and let the mold set for a few minutes in the fridge. The contrast between the pale shells and dark halves will be visible and lovely. (Mini tip: chill for firm seams.)
- After the molds are set, add another layer of dark chocolate to the 3 chocolate cavities. The tempered chocolate is much thinner than the candy melts so the extra layer will give it some more stability. Make sure edges look even and smooth. (Mini tip: use a spoon edge to clean the rims.)
- Return the molds to the fridge for 5-10 minutes to set completely. Check that the halves feel firm and hold their shape. If they wobble, give them more time.
- When the molds are set, take them out of the fridge and carefully pull each of the spheres out of the mold. Work gently so the rims do not chip. Place them on a flat plate. (Mini tip: warm your hands slightly to ease removal without melting the chocolate.)
- Next, you’ll need a hot surface to melt the edges of your spheres. You could either use a warm frying pan or a plate that you microwave for 20-30 seconds. Touch the edge to check warmth; it should be hot but not burning. (Mini tip: test one edge first.)
- Melt the edges of a dark chocolate sphere half and flip it over. Fill the sphere half with a heaping tablespoon of hot chocolate mix, 7-8 marshmallows, and 3 mini Oreo cookies. Pack the fillings gently so the final bomb sits evenly. (Mini tip: count your marshmallows for consistent melts.)
- Immediately place a cookies ‘n’ cream sphere half right on top of the filled dark chocolate half and give both halves a few twists to meld them together. Hold for a moment so the seam seals. The twist helps create a clean bond. (Mini tip: wipe any stray chocolate from the seam.)
- Repeat this process with the other 2 hot chocolate bombs. Set them on parchment while you finish. Try to work swiftly so the filling stays dry. (Mini tip: keep finished bombs in a single layer.)
- Now it’s time to decorate! Melt the remaining ¼ cup of cookies ‘n’ cream just like you did with the other melts. Once the chocolate is melted and creamy, use a spoon to drizzle the chocolate over the hot chocolate bombs. Add some sprinkles right away before the chocolate sets and give them a quick press to make sure they stay on tight. (Mini tip: drizzle in steady, confident strokes.)
- Use the extra melted chocolate as glue to stick a mini Oreo flat on top of the hot chocolate bombs and another standing up next to it. Press gently. The cookie stands like a small flag. (Mini tip: attach while glaze is still wet.)
- Let your hot chocolate bombs set for a few minutes and they’re ready to go! Store them in a cool, dry place until serving. (Mini tip: avoid warm cupboards.)
- To use the hot chocolate bombs, place one in a mug and slowly pour 8 ounces of very warm milk right on top. Give the hot chocolate a quick stir to reveal your Oreo hot chocolate. The shell will crack, the marshmallows will float, and the Oreo bits will soften into a rich, cookie-kissed drink. (Mini tip: pour slowly for the best reveal.)
Bringing Oreo Hot Chocolate Bombs to the Table

I like to place a small tray of three bombs on the table with a cloth napkin that has a tiny chocolate smudge now and then. The scene is simple: warm mugs, a small pitcher of extra milk, and perhaps a few crisp biscotti for nibbling. It invites people to slow down and take part in the reveal. The steam curls, the marshmallows soften, and the cookie scent spreads through the air. When someone lifts a mug and breathes in that first steam, they often close their eyes. That pause is the whole gift.
For a small gathering, I add a bowl of extra mini marshmallows and a jar of sprinkles so each person can decorate their own cup. Kids love the chance to choose their color and press a tiny Oreo on top. Adults find it soothing to stir and watch the chocolate bloom. If you want a softer dessert afterward, try pairing the bombs with a chewy cookie, like these classic pumpkin chocolate chip cookies, which echo the same spiced warmth.
How to Keep This Dish Restorative Tomorrow
Store your Oreo Hot Chocolate Bombs in an airtight container at room temperature for up to a week, if your home is cool. If your kitchen runs warm, place them in the fridge in a single layer separated by parchment. Let them sit at room temperature for 15 minutes before serving so the chocolate softens and the flavor opens.
If you freeze them, put them in a sealed container and use within two months. Thaw slowly in the fridge to avoid condensation on the chocolate shell. The flavors will deepen over time. The marshmallows soften and fold into the cocoa mix more gently, and the Oreo pieces marry with the hot chocolate powder for a richer drink the next day.
When reheating the milk for a bomb, warm it on low to avoid boiling. Very warm milk, not scalding, gives the best melt and keeps the marshmallows pillowy. A slow pour also helps create a dramatic reveal and a creamier texture.
Dalida’s Little Secrets
- Swap the Oreo minis for chopped sandwich cookies if you cannot find the smaller size. The texture will be the same but the bite will be chunkier.
- If you do not have a candy thermometer, rely on feel and look. Stop microwaving when the chocolate is mostly melted with a few small pieces. Stir until smooth and glossy.
- Use silicone molds for easiest release. They flex and save the thin edges. Rigid molds can chip delicate rims.
- For a deeper flavor, add a pinch of fine sea salt to the hot chocolate mix inside the bomb. It brightens the cocoa notes without competing with the sweetness.
- Work in a cool room and keep a towel nearby. Chocolate loves dry hands and dry surfaces.
Family Twists on Oreo Hot Chocolate Bombs
Families make these in different ways. My sister likes to add a few crushed candy canes in winter for a minty crunch. A neighbor mixes in a teaspoon of instant espresso for a wakeful edge. Once during a neighborhood swap, someone lined the top with a thin ribbon of caramel that set into a gleaming crescent. In a small coastal town, friends stir in a pinch of sea salt and a few toasted hazelnuts for a nutty, briny twist that makes the drink feel like a harbor night.
My grandmother, who liked small pleasures, would tuck a tiny piece of caramel in the center of a bomb. When the milk hit, the caramel stretched like a warm thread and you had two textures and a slow smile. Another variation uses white chocolate centers and dark shells, reversing the look for a soft, snowy top and a deep interior. These small changes keep the recipe alive, and each family finds a way to make the bombs speak of home.

FAQs About Oreo Hot Chocolate Bombs
Can I use regular Oreos instead of mini Oreos?
Yes. Regular Oreos work. Chop them into smaller pieces so they fit inside the shell and melt more evenly.
Do the hot chocolate bombs melt in hot weather?
They can. Keep them in a cool spot or the fridge. Take them out 15 minutes before serving for the best texture.
Can I make them ahead for a party?
Absolutely. Make them up to a week in advance if kept cool and dry. Freeze for longer storage and thaw gently in the fridge.
What milk works best?
Whole milk gives the richest result. Plant milks like oat or almond work well and add their own flavor notes.
How do I fix a cracked seam?
Melt a small spoon of chocolate and use it as glue along the seam. Hold briefly until it sets.
A Final Thought
When I close my eyes, I can see the soft circle of steam and hear the small plop as the candy shell breaks. Making Oreo Hot Chocolate Bombs is a way to slow down and invite warmth into a room. They are not just sweets. They are a language of care, a way to say welcome without words. If you make a tray for a friend, bring it with a note. If you sit down with family, let everyone decorate their cup. This small, sweet ritual carries more memory than effort.
Conclusion
If you want a step-by-step photo guide and small variations, this page shows detailed instructions that many home cooks like: How to make the best Oreo Hot Chocolate Bombs. For another family-inspired take with extra decorating ideas, read this warm recipe collection: Oreo Hot Chocolate Bombs • MidgetMomma.
May your kitchen be a place of soft light and small good things.
Oreo Hot Chocolate Bombs
Ingredients
Method
- Melt ⅔ cup of the cookies ‘n’ cream candy melts in a glass bowl in the microwave at 50% power for 1 minute, stirring until glossy.
- Add about 1 tablespoon of melted candy melts into 3 silicone mold cavities. Use a spoon to coat the entire half-sphere, ensuring thicker edges.
- Put the mold in the fridge to set while preparing dark chocolate halves.
- Chop ¾ of the dark chocolate and microwave at 50% power for 30 seconds, stirring after each interval until shiny.
- Check the temperature; temper the dark chocolate using a candy thermometer, aiming for close to 90 degrees but not passing it.
- Remove the candy melts from the fridge and coat the remaining 3 cavities with the tempered dark chocolate, chilling again to set.
- Once set, add another thin layer of dark chocolate to ensure stability and chill for another 5-10 minutes.
- Carefully extract the chocolate spheres from molds and prepare to fill.
- Melt the edges of a dark chocolate sphere half to help seal the bombs. Fill with hot chocolate mix, marshmallows, and mini Oreo pieces.
- Place a cookies ‘n’ cream sphere half on top, twist gently to seal, and place on parchment paper.
- Melt remaining cookies ‘n’ cream candy melts and drizzle over the completed bombs, adding sprinkles immediately.
- Finish by sticking a mini Oreo on top of each bomb before the chocolate sets.
- To enjoy, place one bomb in a mug and pour 8 ounces of very warm milk over it, stirring to reveal the hot chocolate.