
Be warned, these gelatin cubes vanish faster than cookies on a Sunday afternoon.
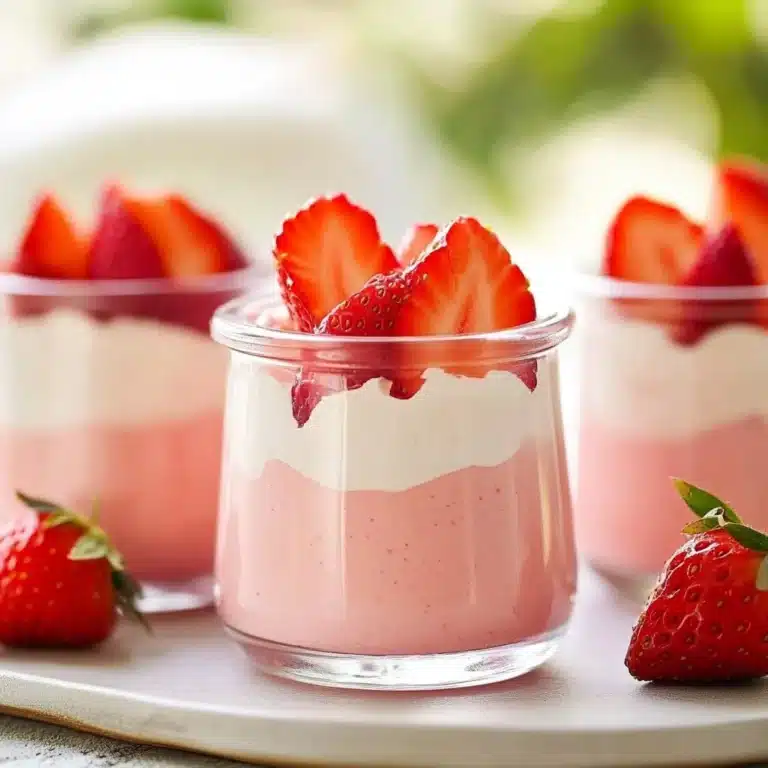
Picture this: a spoon clinks against glass, a citrus scent curls through the kitchen, and the bright, jiggle-ready cubes catch the light like little jewels. The air feels cozy, the counters are slightly sticky, and you grin because dessert is done and the table is smiling back.
I remember making gelatin with my grandmother, who loved the way light caught the cubes and how everyone reached for the prettiest color. That memory of laughter and sticky fingers is exactly what Homemade Gelatin Cubes: A Practical Recipe Guide is all about. Let’s warm up the kitchen and make something nostalgic.
Why You’ll Love This Homemade Gelatin Cubes: A Practical Recipe Guide
This recipe is like a tiny party in a jar. It is simple, bright, and perfect for sharing at family dinners, picnics, or when you need a small happy bite after school. Homemade Gelatin Cubes: A Practical Recipe Guide brings a sense of old-fashioned charm with a modern, healthy twist.
They are not fussy. Kids adore the jiggly texture, adults love the light sweetness, and anyone watching their portions will appreciate how easy it is to control the flavors and the sugar. Make them before a holiday meal, and they will disappear by the time coffee is poured.
These cubes also pair brilliantly with other homemade treats. Try them beside something crunchy for contrast or under a scoop of vanilla for a playful dessert. And if you want another easy snack to make on a day like this, you might enjoy a savory dip recipe I love: my go-to homemade salsa that brightens any snack plate.

How to Make Homemade Gelatin Cubes: A Practical Recipe Guide
“If your kitchen smells like butter and brown sugar, you’re doing it right.”
First, a quick overview. This is the kind of recipe that feels fancy but takes very little time. You bloom gelatin, add warm water to dissolve, fold in a bright note of lemon, pour gently, chill, and then cut. The whole process teaches you to watch textures and to trust your instincts.
As you mix, you will notice the surface calm down as gelatin dissolves, and your spoon will become the best judge of readiness. The final set has a gentle wobble, not floppy and not rubbery. That balance is the secret to those perfect cubes that feel nostalgic and fresh at once.
If you are exploring other cozy snacks to make while the gelatin chills, consider this playful treat for a later afternoon: air fryer apple fries. They are crisp, warm, and pair nicely with a cool gelatin cube.
The Sweet Line-Up
- 1 tablespoon grass-fed unflavored gelatin
Friendly note: use quality gelatin for the best texture and clarity. - ½ cup cold filtered water
Friendly note: cold water gives the gelatin time to bloom evenly. - ½ cup hot water
Friendly note: hot, not boiling. Too hot can change texture. - 1 teaspoon lemon juice
Friendly note: fresh lemon brightens the sweetness and adds a clean finish.
A few quick pointers before you start: get a small whisk or fork ready, choose simple molds or a shallow dish, and have your refrigerator shelf clear for a couple of hours. Don’t skip the lemon. It lifts the flavor like sunlight.
Step-by-Step Directions
- Bloom the gelatin.
Pour the cold water into a small bowl.
Sprinkle the gelatin evenly across the surface and let it sit for 5 to 10 minutes until spongy. Tip: Blooming is like giving gelatin a little wake-up. Skip rushing this step. - Dissolve.
Add the hot (not boiling) water and stir until the gelatin fully dissolves.
The mixture will go clear when done; no grains should remain. Tip: Stir gently. No vigorous shaking; we want smooth clarity, not bubbles. - Flavor.
Mix in lemon juice and sweetener if using.
Stir until everything is evenly combined and the aroma lifts. Tip: Taste a tiny spoonful to adjust sweetness. Lemon should sing, not shout. - Set.
Pour the mixture into jars, silicone molds, or a shallow dish.
Smooth the top with the back of a spoon if you want a neat finish. Tip: Pour slowly to avoid splashes. If making layers, let each set before pouring the next. - Chill.
Refrigerate for 2 to 3 hours, or until firm.
The cubes should wiggle gently but hold their shape. Tip: Avoid the freezer for setting. Too cold makes them cloudy and texturally off. - Use.
Cut into cubes and enjoy 15 to 30 minutes before meals to help manage hunger and cravings.
Or serve anytime you need a cheerful little dessert. Tip: For clean cuts, dip your knife in hot water and wipe it between slices.
Each step is simple, and the rhythm of these small tasks feels almost meditative. The payoff is that joyful wobble and the bright mouthfeel that brings everyone to the table smiling.
Serving Homemade Gelatin Cubes: A Practical Recipe Guide With Love
Serve them as a light dessert after a big family meal, bring them to potlucks in pretty jars, or tuck them into lunchboxes as a fun surprise. They are beautiful when layered by color, or sprinkled with a few finely chopped fresh berries for a festive look.
If you want a dessert that makes people stop mid-conversation, place a tiny scoop of vanilla on a plate and arrange two or three chilled cubes beside it. The contrast of warm ice cream and cool gelatin is small magic.
For a picnic, pack the cubes in a shallow container lined with parchment. They travel well as long as they stay cool. And if you are setting a table for children, add a small spoon and a napkin and watch how quickly they make friends with the dessert.
If you enjoyed the warm-and-crisp snacks earlier, these cubes will pair sweetly at a family gathering alongside something like air fryer fried pickles, where texture and temperature play perfectly against one another.

How to Store and Enjoy Later
Keep your gelatin cubes in an airtight container in the refrigerator. They stay fresh for 3 to 5 days and keep their bright color and clean taste.
If you need to travel with them, place a small ice pack under the container. They like cool, steady temperatures and gentle handling.
Don’t freeze gelatin cubes. Freezing changes the structure and makes them weep when thawed. If you want a long-term option, consider making a concentrate and storing it in the fridge to rehydrate later with hot water.
Leftover cubes can be repurposed. Chop them and add to yogurt, fold into fruit salads, or let them top a chilled pudding for layers of texture. They are an excellent way to brighten breakfasts and snacks.
Tips, Tricks, and Sweet Secrets
- Use glass or silicone molds for the cleanest look. Plastic can sometimes cloud the edges.
Little memory: my aunt used tea cups as molds, and each cup looked like a tiny dessert treasure. - Avoid boiling water. Boiling changes gelatin’s texture and can reduce its firmness. Instead, heat water until it steams and feels hot to the touch. Stir to dissolve.
- Add a splash of juice or a tiny amount of herbal tea to infuse subtle flavors. Hibiscus or berry teas make gorgeous colors.
Expert note: if using juice, adjust lemon to keep the balance of brightness. - For a glossy finish, brush the top gently with a tiny amount of neutral syrup before serving. It makes the cubes shimmer.
- If you want a firmer set for stacking, increase gelatin by about 25 percent. Test one small batch before changing the full recipe.
Quick fix: if your set is too soft, remelt gently, add a pinch more gelatin dissolved in warm water, and chill again.
I learned these tricks over many late evenings, when trial and error was my teacher and sticky countertops were the evidence of joyful practice. Trust the texture cues and your spoon. They will guide you well.
For another cozy bake to try while these chill, you might like these apple muffins, warm and tender: apple cinnamon streusel muffins. They fill the house with a wonderful aroma while your gelatin sets.
Delicious Variations
- Citrus Garden: Replace part of the lemon juice with orange juice for a layered citrus flavor. Top with thin orange zest for a fragrant finish.
- Berry Patch: Gently fold in a handful of pureed strawberries or raspberries before pouring. You will get soft swirls of color and real berry texture.
- Herbal Twist: Steep a strong chamomile or mint tea in the hot water, then cool slightly before mixing with gelatin. This is calm and elegant for a small dinner party.
- Tropical Breeze: Use coconut water instead of part of the cold water. Add a drop of vanilla and a sliver of toasted coconut on top.
- Festive Layering: Make thin layers in different colors. Pour a thin layer, chill until just set, then add the next color. This takes patience, but the result is a showstopper.
- Adult Version: Add a splash of fortified wine or a light liqueur to a portion of the mix for cocktail-style cubes. Keep quantities small to preserve texture.
Each variation changes the mood of the dish. Seasonal ingredients will make these cubes feel like a new recipe every time. From summer parties to cozy winter treats, there is a version for every occasion.
FAQs About Homemade Gelatin Cubes: A Practical Recipe Guide
Can I use flavored gelatin packets instead of unflavored?
Yes, you can. Flavored packets add color and flavor, but they often have extra sugar and artificial ingredients. If you want control over sweetness, stick to unflavored and add real juice or tea.
My gelatin turned out too rubbery. What happened?
Too much gelatin or boiling water can cause rubberiness. Next time, reduce the gelatin slightly or make sure the water is only hot, not boiling. Gentle stirring helps too.
Can I sweeten with honey or maple instead of sugar?
Absolutely. Warm the sweetener slightly with the hot water to help it dissolve. Honey and maple add depth and pair beautifully with citrus or herbal flavors.
How do I cut perfectly even cubes?
Use a sharp knife and warm it briefly in hot water. Wipe between cuts. A ruler helps if you want precise sizes, but freehand is charming and quick.
Are gelatin cubes good for portion control?
Yes. They are light and satisfying, making them a perfect small treat. Serving in small jars or a shallow dish helps control portions.
A Final Bite
Bake this once and you will be roped into bringing it to every family gathering. The simplicity of Homemade Gelatin Cubes: A Practical Recipe Guide makes them a go-to when you want something homemade that feels thoughtful and bright. The sweetness sits lightly on the tongue, the texture invites little giggles, and the memories come wrapped in color.
If you want to keep exploring flavors, keep a small notebook with your combinations. You will build a little library of favorite mixes in no time. And when you make them for others, watch how fast faces light up. That is the true dessert magic.
Conclusion
If you are curious about the broader gelatin trend and how people are thinking about gelatin for health and recipes, this article gives a clear overview of the topic The 2026 gelatin weight-loss drink trend explained and this resource offers practical tips and safety notes for using gelatin in modern recipes The gelatin trick explained with real-life results.
Happy jiggling, happy sharing, and remember that the best recipes are the ones that bring people close.

Homemade Gelatin Cubes
Ingredients
Method
- Pour the cold water into a small bowl.
- Sprinkle the gelatin evenly across the surface and let it sit for 5 to 10 minutes until spongy.
- Tip: Blooming is like giving gelatin a little wake-up. Skip rushing this step.
- Add the hot (not boiling) water and stir until the gelatin fully dissolves.
- The mixture will go clear when done; no grains should remain.
- Tip: Stir gently. No vigorous shaking; we want smooth clarity, not bubbles.
- Mix in lemon juice and sweetener if using.
- Stir until everything is evenly combined and the aroma lifts.
- Tip: Taste a tiny spoonful to adjust sweetness. Lemon should sing, not shout.
- Pour the mixture into jars, silicone molds, or a shallow dish.
- Smooth the top with the back of a spoon if you want a neat finish.
- Tip: Pour slowly to avoid splashes. If making layers, let each set before pouring the next.
- Refrigerate for 2 to 3 hours, or until firm.
- The cubes should wiggle gently but hold their shape.
- Tip: Avoid the freezer for setting. Too cold makes them cloudy and texturally off.
- Cut into cubes and enjoy 15 to 30 minutes before meals to help manage hunger and cravings.
- Or serve anytime you need a cheerful little dessert.
- Tip: For clean cuts, dip your knife in hot water and wipe it between slices.