
I remember the kitchen light at dawn, a thin strip across the wooden table, where my mother braided dough with flour-dusted fingers. The smell of warm milk and lemon drew the whole house close. That first slice of Easter Bread, still soft and steaming, felt like a promise: that home held steady, that stories would be told again, and that we were all welcome at the table. Sometimes I serve a slice with a soft flatbread I grew up with for breakfast, like a gentle companion for this sweeter loaf that simple cottage cheese flatbread I love.
Why Easter Bread Belongs in Your Kitchen Story

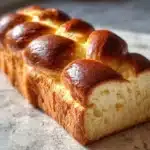
Easter Bread is more than an ingredient list. It is a ribbon of memory, a ritual that marks a season. The braided top, the gloss of egg wash, the pale flecks of lemon zest—each detail carries a voice from the past.
This bread carries comfort. When I slice it, the crumb is tender and soft, and the crust offers a little resistance before giving way. The lemon scent lifts the whole room. For families, it anchors the meal. For those who cook alone, it becomes company.
Making this bread reconnects us to simple skills. We knead and wait, we watch the dough double, and we tell stories while it proofs. The act itself slows time so we can remember birthdays, old recipes, and the small things that stitched our days together.
Through the years I noticed people bring small changes to the dough, folding in raisins or painting pastel sprinkles. Those changes do not erase the heart of the bread. Instead, they let a new generation add its voice. And that is why Easter Bread still belongs in our kitchens: it holds the past and invites the present.
How to Make Easter Bread
“Every time I stir this pot, it smells just like Sunday at home.”
Before you begin, imagine the dough soft and slightly tacky, the room warming as it rests. Color cues will guide you. The dough should look pale and glossy after kneading. After the first rise, it will puff and smooth out like a cloud. When you brush the top with egg wash, it will catch the oven light and brown to a honeyed gold.
A few technique notes matter here. Warm milk should be just shy of hot to the touch. If it is too warm, it will harm the yeast. Knead until the dough feels elastic and springs back slowly when pressed. These cues tell you the gluten has developed and the texture will be airy yet tender.
Now we will gather the ingredients. Once you have everything in place, the process flows naturally. The dough will ask little of you: gentle hands, a warm place to rest, and time.
Ingredients You Will Need
4 cups all-purpose flour
1/2 cup sugar
2 teaspoons active dry yeast
1/2 cup milk
1/2 cup unsalted butter, softened
3 large eggs
1 teaspoon salt
1 teaspoon vanilla extract
Zest of 1 lemon
Egg wash (1 egg beaten)
Friendly side notes: use real unsalted butter if you can; it gives the crumb a clean, creamy flavor. If you like a brighter aroma, the zest of a fresh lemon lifts the whole loaf. For a lighter, open crumb at breakfast, consider pairing a thin slice with a soft accompaniment such as the tangy Greek yogurt flatbread that layers flavors simply.
A few pantry thoughts: measure flour by spooning it into the cup and leveling it off for accuracy. Fresh active dry yeast makes a huge difference; if the proof does not froth, the dough will struggle to rise. If you cannot find active dry yeast, instant yeast can work, but reduce the quantity by about 25 percent and mix it directly with the dry flour rather than proofing.
Step-by-Step Directions
-
In a small bowl, warm the milk and dissolve the yeast in it. Let it sit for about 5 minutes until frothy.
Stir gently and check for little bubbles on the surface. If nothing appears, the yeast may be inactive. -
In a large mixing bowl, combine flour, sugar, and salt. Make a well in the center and add the dissolved yeast, eggs, melted butter, vanilla, and lemon zest.
Use a wooden spoon or your hand to bring the wet and dry together. Keep the motion steady until a shaggy dough forms. -
Mix until a dough forms. Knead the dough on a floured surface for about 10 minutes until smooth and elastic.
Push with the heel of your hand, fold, and turn. The dough should feel supple and slightly tacky, not sticky. -
Place the dough in a greased bowl, cover, and let it rise in a warm place until doubled in size, about 1 hour.
I like to set the bowl in a cold oven with the light on or near a warm pot of water. Watch for a gentle dome. -
Punch down the dough and shape into a loaf. Place in a greased loaf pan.
After the punch-down, rest for a few minutes so the gluten relaxes, then shape with soft hands so the loaf keeps air pockets. -
Cover and let rise again until doubled, about 30 minutes.
This second rise gives the bread its soft interior. It should feel light and airy when you touch the top. -
Preheat the oven to 350°F (175°C). Brush the top with the egg wash.
Brushing gently ensures an even golden color. If you like, sprinkle a little sugar for a glinting crust. -
Bake for 30-35 minutes until golden brown. Check the center with a skewer; it should come out clean.
If the top browns too quickly, tent with foil for the last 10 minutes. The loaf should sound hollow when tapped on the bottom. -
Let cool before slicing and enjoy your Easter bread with family.
Once cooled, the crumb will finish setting and slicing will be clean. Store leftover slices wrapped in cloth or in an airtight container.
Mini-tips woven through these steps help keep you steady. Watch for glossy surfaces on the kneaded dough. If the dough resists stretching, rest it for five minutes and try again. If edges begin to color too fast, lower the oven rack a notch and tent with foil. Each small decision protects the soft crumb you aim for.
Bringing Easter Bread to the Table

When the oven door opens, the first breath of warm lemon and butter fills the room. That scent calls people from other rooms like a soft bell. I place the loaf on a wooden board and slice with a serrated knife so each cut keeps the structure intact.
Serve warm or at room temperature. A little pat of butter melts into the crumb and the surface grows glossy again. For a larger meal the loaf sits with boiled eggs, soft cheeses, and a bowl of jam. For an intimate afternoon tea, it pairs with honey and a light cheese.
The table I set is never perfect. A cloth with a few flour smudges makes the scene honest. We pass the loaf, and each person tells a small memory as they take their slice. That ritual turns a simple bread into a gathering. Serving Easter Bread is really a way to give the season its voice through food.
If you want a bright contrast, try pairing a slice with a citrus loaf. I like to offer a tart slice of cranberry orange loaf at the side for those who love a contrasting note.
How to Keep This Dish Restorative Tomorrow
Leftover Easter Bread is a comfort for the next day. The crumb will slightly tighten as it cools, but the flavors deepen. Store the loaf wrapped in a cloth, then into a loosely closed container. This method preserves the crust’s gentle chew while keeping the inside soft.
For short term storage, keep at room temperature for up to three days. For longer storage, slice and freeze in an airtight bag for up to three months. Toast frozen slices directly from the freezer for a few minutes; the steam warms the crumb and revives the texture.
Reheating tips: warm slices in a 300°F oven for 8 to 10 minutes, or pop them in the toaster for a quicker fix. Slightly dampen a paper towel and microwave briefly if you need immediate warmth, but watch the time; microwaving too long dries the bread.
If you plan to repurpose slices, toast them gently and serve with ricotta and honey, or dip into egg custard for a soft French toast. Each reheating method gives the loaf a new life and preserves the memory of that first hot slice from the oven.
Dalida’s Little Secrets
-
Temperatures matter.
I warm milk until it is just warm to the wrist. Too hot and the yeast will die; too cold and the rise will take much longer. -
Butter choice shapes the crumb.
Use unsalted butter and add salt separately. This gives you control and prevents an overly salty loaf. For a richer flavor, brown the butter slightly, cool it, and then fold it in. -
Proofing cues over clock time.
Learn to trust the dough. If your kitchen is chilly, the rise will take longer. Look for the dough to double, not a timer. -
Add-ins and their moisture.
If you fold in raisins, candied peel, or nuts, toss them in a bit of flour first so they do not sink to the bottom. If adding juicy fruit, reduce other liquid slightly to keep the crumb from becoming dense. -
Gentle shaping keeps air.
When you shape into a loaf, handle the dough softly. Pressing too hard will push out the air that gives the bread its lift.
These notes come from decades in small kitchens. I learned to pause, taste the dough, and listen to how it feels. The bread rewards patience.
Our Regional Touch
Family recipes travel. In my town we fold a little extra lemon zest into the dough for brightness. In other places families braid red-dyed eggs into the top for a festive look. Some add sweet anise for fragrance, or brush the finish with a light sugar syrup for shine.
My mother sometimes braided her dough into a round and tucked colored eggs into the braids, a symbol we always looked for on the table. Neighbors fold in plump raisins, pine nuts, or orange peel. Coastal families often use olive oil instead of butter for a Mediterranean flair.
These variations teach a simple truth: the core of Easter Bread is its welcome. Change the small things and the loaf becomes yours without losing its soul. For a playful dessert twist my cousins set slices alongside a whimsical cake for children, a nod to Easter mornings full of fun and sugar that the kids still love.
Tools and Timing You Can Trust
A few reliable tools make the process easier. Use a mixing bowl large enough that the dough can grow without spilling. A bench scraper helps manage sticky dough while kneading. A good loaf pan, greased well, gives the bread its shape and supports the bake.
Time expectations: active hands-on time is about 30 to 45 minutes, including mixing and kneading. Then plan for about 1 hour for the first rise and 30 minutes for the second. Baking takes 30 to 35 minutes. In total, expect roughly three hours from start to finish, with most of that being peaceful waiting.
If you are short on time, you can prepare the dough in the evening and place it in the refrigerator for a slow overnight rise. The slow chill develops flavor and lets you bake fresh in the morning. When using the refrigerator, bring the dough back to room temperature for about 30 minutes before shaping and the second rise.
Troubleshooting Common Moments
The bread does not rise: Check your yeast. If the milk was too hot when you added the yeast or the yeast was old, it may not activate. Try proofing again with new yeast and slightly warmer milk.
The crust browns too fast: Tent the loaf with foil and move the rack down a notch. This prevents the top from burning while the center finishes.
The crumb is dense: You may have overfloured the dough or under-kneaded. Kneading builds the gluten framework that traps gas and gives a light crumb. Also, be sure the dough had enough time to rise and double.
The loaf collapses: Overproofing can weaken the structure. When the dough is doubled, shape and bake rather than letting it sit too long. A quick finger test helps: gently press; if the indentation springs back slowly, it is ready.
These are small lessons that reassure you as you bake. Each batch teaches you more about your kitchen and the rhythm of bread.
Heritage Variations
Families keep a map of minor changes that feel like personality. Some of our neighbors fold in a handful of toasted almonds for a nutty finish. Others add a ribbon of orange marmalade between folds for a surprise center. In my family a scattering of pearl sugar on top gave the loaf a sparkly look our grandchildren adored.
Across regions, spices change. Anise or aniseed gives a licorice note common in some Italian versions. Cardamom adds a green perfume in northern traditions. For a lighter take, some use half the butter and replace it with olive oil.
Cultural swaps happen naturally. A sprinkle of sesame seeds can give a savory tilt for those who prefer less sweet bread. For a brunch crowd, cubes of sharp cheese tucked into the top produce a savory-sweet gift.
Whatever you choose, these variations keep the bread alive. They let each family make the loaf speak in its own voice while still belonging to the larger mosaic of Easter tables.
FAQs About Easter Bread
Can I use honey instead of sugar?
Yes. Honey gives a softer sweetness and a deeper aroma. It also keeps the crumb tender. Use about 3/4 of the sugar amount in honey and slightly reduce the liquid if the dough feels too soft.
Do I have to use real lemon zest?
You do not have to, but fresh zest gives a bright, citrusy lift that dried zest cannot match. If using bottled lemon extract, use it sparingly because it is more concentrated.
Can I make this bread gluten-free?
Gluten-free baking requires different blends and often xanthan gum to mimic elasticity. This recipe relies on gluten for structure, so substitute cautiously and expect a denser crumb.
How do I know when the loaf is fully baked?
Tap the bottom of the loaf; a hollow sound is a good sign. Use an instant-read thermometer: the center should read about 190°F. Clean skewer test is also reassuring.
Is there a way to speed up the rise?
A warm proofing box accelerates the process, but I prefer gentle timing. For a quick boost, set the bowl on top of a warm stove that is turned off, or near a pan of warm water, but avoid direct heat.
These answers come from sitting with many loaves and watching families learn and laugh as they bake. I trust these small suggestions to guide you gently.

Conclusion
I invite you to let this Easter Bread be a small ceremony in your home, a loaf that carries stories, smells, and the kindness of slow work. For a classic Italian influence and an extended discussion of braiding and variations, I often cross-check techniques with resources like Sprinkle Bakes’ Italian Easter Bread recipe, which shows how simple swaps can change the shape and charm of the loaf. If you want to explore another traditional take and family notes on method and symbolism, the classic page at The Italian Dish’s Italian Easter Bread page offers a warm, detailed look that complements this recipe.
May your kitchen fill with the same light and the same scent I remember. Take your time, listen to the dough, and share the first slice with someone you love.

Easter Bread
Ingredients
Method
- In a small bowl, warm the milk and dissolve the yeast in it. Let it sit for about 5 minutes until frothy.
- In a large mixing bowl, combine flour, sugar, and salt. Make a well in the center and add the dissolved yeast, eggs, melted butter, vanilla, and lemon zest.
- Use a wooden spoon or your hand to bring the wet and dry together until a shaggy dough forms.
- Knead the dough on a floured surface for about 10 minutes until smooth and elastic.
- Place the dough in a greased bowl, cover, and let it rise in a warm place until doubled in size, about 1 hour.
- Punch down the dough and shape into a loaf. Place in a greased loaf pan.
- Cover and let rise again until doubled, about 30 minutes.
- Preheat the oven to 350°F (175°C). Brush the top with the egg wash.
- Bake for 30-35 minutes until golden brown. Check the center with a skewer; it should come out clean.
- Let cool before slicing and enjoy your Easter Bread.