
Baking Polar Bear Cookies is like a warm hug on a chilly day. The smell of butter melting and sugar swirling together is pure magic. And when you add a dash of cream cheese, oh boy, the joy just doubles. So, let’s dive into this delightful indulgence. Just be warned, these cozy cookies tend to disappear faster than you can say “holiday treats.”
Why You’ll Love This Polar Bear Cookies
You might be wondering, why Polar Bear Cookies? Well, let me tell you, these baked beauties bring everyone together. Whether it’s a chilly winter day or a festive gathering, these cookies are a crowd-pleaser. Family and friends gather around the table, eyes sparkling at the sight of these frosted delights. A cookie that looks like a bear and tastes like a dream? Who wouldn’t love that?
These cookies have become a family favorite in our household, making appearances at birthdays, holiday parties, and even simple weeknight dinners. Each bite tells a story of laughter, love, and memories created around the kitchen island. The playful design and delicious flavors make them perfect for kids and adults alike. Everyone gets to enjoy the delicious sweetness and the creative decorating process that turns cookies into little works of art.
Baking these cookies feels like passing down a cherished tradition. Perhaps it’s the cream cheese that gives them the extra fluffiness, or maybe it’s the way they come out of the oven, perfectly golden and begging for frosting. Every year, we make a batch and remember where we came from and how far we’ve come. So, let’s get into the fun part making these delightful Polar Bear Cookies!
Mixing, Baking, and Smiling Through It
“If your kitchen smells like butter and brown sugar, you’re doing it right.”
Now, let’s talk about how to create these adorable Polar Bear Cookies. The process is straightforward, and it’s hard not to smile while you mix and bake. You will witness how simple ingredients come together to create a feast for the taste buds.
Ingredients You’ll Need
Before we get baking, here’s a friendly list of all the glorious ingredients you’ll need to whip up these Polar Bear Cookies:
- 3/4 cup (1 1/2 sticks) unsalted butter, room temperature (170g)
- 1/2 cup or 4 oz. full-fat cream cheese, room temp (113g)
- 1 1/2 cups granulated sugar (300g)
- 1 large egg, room temperature (56g)
- 2 tsp vanilla extract or vanilla bean paste (8g)
- 3 cups all-purpose flour (375g)
- 1 Tbsp cornstarch (8g)
- 1/2 tsp baking powder (2g)
- 1/2 tsp fine salt (3g)
- 1 cup unsalted butter, room temperature (226g)
- 1 Tbsp vanilla extract or vanilla bean paste (12g)
- 1/2 tsp fine salt (3g)
- 3 1/2 cups powdered sugar (454g or 1 lb. box)
- 1/4 cup heavy whipping cream, room temperature (60g)
- 1 cup coarse sanding sugar
- 30 large chocolate chips (I used Ghirardelli dark chocolate chips)
- Round black sprinkles
- Round red or pink sprinkles (one per cookie)
And here’s a little baking tip: use real butter for the best flavor! The good stuff really makes a difference, trust me. Also, don’t skip the pinch of salt; it helps to balance the sweetness and brings all the flavors together perfectly.
Step-by-Step Directions
Now, let’s get down to the nitty-gritty of actually making these Polar Bear Cookies. This is where the fun begins!
Step 1: Soft-Batch Cream Cheese Cookies
- Start by preheating your oven to 350°F (175°C). Line two baking sheets with parchment paper. Getting the oven warm and cozy is a must.
- In a large mixing bowl, beat together the butter and cream cheese until it’s creamy and smooth. This might take about 2 to 3 minutes, so feel free to hum a little tune while you mix.
- Gradually add in the granulated sugar and continue beating until the mixture is light and fluffy this usually takes another 3 minutes.
- Next, beat in the egg and the vanilla until it’s all well combined. The batter should look silky at this point, and oh, the aroma will be heavenly!
- In a separate bowl, whisk together the flour, cornstarch, baking powder, and salt. Don’t skip that whisking; it’ll help everything blend together nicely.
- Slowly add the dry ingredients to the wet mixture, stirring just until combined. Remember, don’t overmix we want tender crumbs, not tough dough!
Step 2: Forming and Baking
- Using a cookie scoop or two spoons, drop rounded tablespoons of dough onto the prepared baking sheets, leaving some space between each cookie. They will spread a little while baking.
- Bake in the preheated oven for about 10-12 minutes. You want the edges to be lightly golden but the center remains soft. The smell of cookies baking will fill your kitchen; enjoy it!
- Once baked, allow them to cool on the baking sheets for a few minutes before transferring them to a wire rack. Patience is key don’t burn your fingers!
Step 3: Buttercream Frosting
- While the cookies cool, you can whip up the delightful buttercream frosting. Beat together the room-temperature unsalted butter and vanilla until they are nice and creamy.
- Gradually add in the powdered sugar and salt, then mix until smooth. Add in the heavy cream, which will help to fluff it up, and mix again until everything is light and spreadable.
- If your frosting seems a little too thick, add a splash more cream. You want it to be the perfect consistency for spreading and decorating.
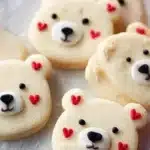
Step 4: Decorating These Polar Bear Cookies
- Once your cookies are fully cooled, it’s time to frost them. You can use a butter knife or a piping bag to add a good swirl of frosting on each cookie.
- Dip the frosted cookies into the coarse sanding sugar to create that snowy effect. They will look mesmerizing!
- Next, take chocolate chips for the eyes and add them gently into the frosting. You can use a round sprinkle for the nose. Show your creativity here; let each cookie have its character.
- Finally, add a sprinkle on top, and voila! You have adorable Polar Bear Cookies.
Serving Polar Bear Cookies With Love
There’s nothing quite like serving freshly baked Polar Bear Cookies. Warm out of the oven, when the frosting is just slightly melty, these cookies are nothing short of irresistible. Picture this: gathering around the table with loved ones, laughter booming, and sweet treats in hand.
These cookies are perfect for sharing during family gatherings or passing around at holiday celebrations. You’ll find people gravitating toward the cookies, their eyes lighting up with delight. And if you decide to crumble one on top of a scoop of vanilla ice cream, you just might create the ultimate sweet treat. Dreamy, soft, and undeniably delicious, these cookies call for moments of joy and celebration.

How to Store and Enjoy Later
What’s the best way to keep your Polar Bear Cookies fresh? Once they’re completely cooled, you can store them in an airtight container at room temperature. They can last for about 3–5 days, which is perfect for sneaky late-night snacks.
If you want to save some for later, you can freeze them as well. Wrap each cookie in plastic wrap, then place them inside a freezer bag. Trust me, there’s nothing better than pulling these little bears straight from the freezer and enjoying them with a warm cup of coffee or hot chocolate on a lazy winter afternoon.
Tips, Tricks, and Sweet Secrets
Baking is an adventure, and I have a few sweet secrets I love to share:
- Flavor Swaps: Add a pinch of cinnamon or nutmeg to the dough for a seasonal twist. It will elevate the flavors and remind you of cozy holidays.
- Decorating: Get creative with your toppings. Try using different colored sprinkles for birthdays or special events. Personalizing them makes every batch feel unique.
- Leftover Cookies: What do you do with leftover cookies? Crumble them over ice cream or mix them into a milkshake. Talk about transformation!
- Nutty Addition: Chop some nuts, like walnuts or almonds, and mix them into the dough for a delightful crunch.
- Frosting Variations: Jazz up your buttercream frosting with different flavors, like chocolate or mint for a fun twist.
Delicious Variations
The beauty of Polar Bear Cookies is their versatility. You can create a variety of flavors depending on the season or occasion:
- Autumn Twist: Add pumpkin spice to the dough for a fall-inspired treat. Top it with orange frosting for added seasonal cheer.
- Berry Delicious: During summer, incorporate freeze-dried strawberries into the frosting for a fruity punch. They’ll lend a delightful color and flavor to your decor.
- Holiday Cheer: Incorporate festive spices like peppermint extract or crushed candy canes into your frosting during the holidays for a new take.
- Chocolate Lovers: Stir in cocoa powder to the dough and make chocolatey bears, frosting them with chocolate buttercream.
- Fruity Fun: Add lemon zest to the batter, and pair it with a light lemon frosting for a refreshing summer cookie.
Hungry for More Sweet Inspiration?
Don’t stop here! I’ve got a whole tray of cozy desserts waiting for you — from gooey cobblers to dreamy crisps and frosted muffins.
Polar Bear Cookies
Ingredients
Method
- Preheat your oven to 350°F (175°C). Line two baking sheets with parchment paper.
- In a large mixing bowl, beat together the butter and cream cheese until creamy and smooth, about 2 to 3 minutes.
- Gradually add in the granulated sugar and continue beating until light and fluffy, about another 3 minutes.
- Beat in the egg and vanilla until well combined, the batter should be silky.
- In a separate bowl, whisk together the flour, cornstarch, baking powder, and salt.
- Slowly add the dry ingredients to the wet mixture, stirring just until combined.
- Using a cookie scoop or two spoons, drop rounded tablespoons of dough onto the prepared baking sheets.
- Bake in the preheated oven for about 10-12 minutes until the edges are lightly golden and the center remains soft.
- Allow the cookies to cool on the baking sheets before transferring them to a wire rack.
- Beat together the room-temperature unsalted butter and vanilla until creamy.
- Gradually add in the powdered sugar and salt, then mix until smooth.
- Add in the heavy cream and mix until the frosting is light and spreadable.
- Frost the cooled cookies using a butter knife or piping bag.
- Dip the frosted cookies into the coarse sanding sugar.
- Add chocolate chips for the eyes and round sprinkles for the nose, creating playful characters.
Nutrition
Notes
Tried this recipe?
Let us know how it was!FAQs About Polar Bear Cookies
Q: What if I don’t have cream cheese?
A: You can use additional butter, but cream cheese is the secret to that soft texture. Don’t skip it if you can help it!
Q: How can I make my cookies thicker?
A: Chill the dough for about 30 minutes before baking. It helps prevent spread and gives you thicker cookies.
Q: Can I use dairy-free butter?
A: Absolutely! You can use a plant-based butter substituted in equal amounts to keep it dairy-free.
Q: What should I do if my frosting is too thin?
A: Just add a little more powdered sugar until you reach the desired thickness. It’s an easy fix.
Q: Can I make the dough ahead of time?
A: Yes! You can refrigerate the dough for 2–3 days before baking or even freeze it for up to three months. Just thaw in the refrigerator before using.
A Final Bite
Now that you have all the secrets and steps to create these delightful Polar Bear Cookies, it’s time to bake a batch (or two). Just imagine pulling these warm, fluffy cookies out of the oven. You’ll feel like a superstar baker, and trust me, you’ll be roped into making them again and again.
So gather your loved ones, roll up those sleeves, and let the cozy baking begin. Until the next craving hits, happy baking!
Let’s Talk Desserts on Twitter
Baking is more fun when we share it together. Come join me on Twitter, where I post even more cozy bakes, seasonal treats, and sweet kitchen ideas you can whip up anytime.
👉 Follow Me on Twitter for Daily Dessert Joy